Installing Linux to HP iPAQ h63xx series of Devices

1. Overview

(last updated: 17.12.2006)
This page contains detailed instructions of all of the steps required to install the GPE Linux image from the Familiar distribution to your h63xx device from the pre-built images. The image is build by using the openembedded (OE) build system. For further information see http://familiar.handhelds.org and http://oe.handhelds.org.

The HP iPAQ h63xx series of devices offers you the possibility to install an open-source version of Linux to your phone either from via binaries or by building it yourself. Most of the peripherals including the phone are now functional.
Three existing models (h6315 in the USA, h6340 in the European area and h6365 in Asian area have been tested to boot and use gsm functionality.)

1.1 Notes from the Usage

Here are two screenshots from the h6340 while it is running Linux. The picture in the right represents a phone application, known as a Gomunicator that can be used for phone calls as well as for sending and receiving certain basic types of SMS messages. Currently the GPRS usage needs still to be handled by calling the ppp scripts from the command line while gomunicator is not running. (/usr/sbin/pppd call gprs)


H6340 and GPE desktop gomunicator view

Currently the latest h6300 Linux release is based on to Familiar 0.84 with phone stack specific changes required, due to the fact that the amount of open source Linux devices is still pretty low which have prevented the phone stack maturation. Hopefully we will have in the near future the most critical source code pieces from various projects working nicely together. (ppp for gprs/umts connection establishment, sms encoding/decoding from gnokii to have full support to all different SMS message formats, voip when wifi/bt network available, etc...)

Within the current image, the power management is partially working. We are able to receive information from the battery's current voltage level and also report it the battery monitor. In addition we are able to suspend and resume the device without problem by using the power button. In addition of waking up from the power button press, the device is now also able to wake-up for the incoming phone calls. (wake-up from the serial port interrupt)

In the power management area, we will however still clearly need more work for improving the battery duration. One step for the right direction would be to find good replacement for apmd which would handle at least the following issues: (Check also the Nokia Maemo people presentation slides from the slightly same topic area in Fosdem 2006. I am not sure has there been any work after that for for making some of that work to be easily usable also for the non-maemo Linux platforms)
I have still not a clear picture whether we could use PM-utils, or acpid, change the apmd to work also with non-apm interface Linuxes or write new application. So far any of the apps available has not looked good enought for our use cases.

2. Installation Requirements

The current bootsystem uses a two phase bootloader. This means that we need to first boot WinCE and launch an application called "wililo.exe. This will load and start the second phase operating system independent bootloader that will take care of loading and executing the Linux kernel image.

As storage media for the bootloader and Linux files, we are using either MMC or SD cards instead of flashing Linux over the WinCE system. This allows you to use Linux in parallel with WinCE. You can get back to it from Linux by doing a hard reset that will load WinCE from the flash memory. As a hard reset will reset all user data, it is recommended that you backup your data by using the "backup/restore" application before booting to Linux.

2.1 Software and Hardware Requirements

To install Linux to your h6300 you will need following hardware and software components

hardware and software required
Name Description
Desktop Linux or a bootable CD For installing and building applications for the H6300.
MMC/SD Card The 512 MB SD card is the recommend one, but in addition we have tested various other MMC/SD cards with sizes between 128MB and 512 MB.  It is also possible to load the rootfs from desktop linux by using NFS.
MMC memory card reader (USB connection) Required for partitioning the MMC card to VFAT32 and Ext2 partitions in desktop Linux. Usually the MMC memory card reader is connected to the computers USB port. Costs around 20 - 40 euro/dollar. I have for example USB based Lacie 8-in-1 Reader which costs about 20 euro and supports MMS, SD and Secure SD cards.
H6300 USB Cradle The cradle which comes within the H6300. The TCP/IP communication between H6300 and Desktop Linux can be established over this cable.
Bootloader files
Included in the latest installation package. Contains files required for booting Linux from WinCE
Root file system (rootfs)
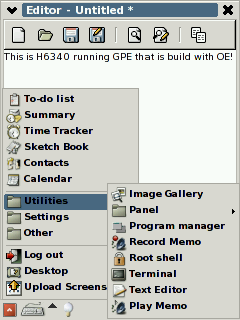
Included in the latest installation package. Contains functional linux system with X windows, SSH daemon, FTP daemon, gpe-applications, kernel modules, etc...

2.2 Latest Installation Files

The following are the files you need to download for a succesful build.
Name/Location Description
downloads/binaries/gpe/h6300_gpe_image_20061206.tar.bz2
Contains the latest versions of the bootloader and Linux rootfs-files. Both of them have been packaged to their own tar.bz2 files inside this file.
h6300_linux_bootloader.tar.bz2 Bootloader files. Obtained from the h6300_gpe_image tar file
h6300_gpe_image_rootfs.tar.bz2 Linux root-partition files. Obtained from the h6300_gpe_image tar file

3. Installation

3.1 Partition your MMC/SD card to Fat32 and Ext2 partitions

To be able to partition the MMC/SD card, you need to use your MMC/SD card reader in Linux in the following way:

1) Remove your SD/MMC card from the memory card reader

2) Check what node names Linux has already reserved to USB/SATA devices.
Issue following command:
    # ls -la /dev/sd*

This should give you a for example a following kind of output:  (can vary a bit depending from the devices connected to your computer)

    [root]$ ls -la /dev/sd*
    brw-rw----  1 root disk 8,  0 kesä    8 23:50 /dev/sda
    brw-rw----  1 root disk 8, 16 kesä    8 23:50 /dev/sdb
    brw-rw----  1 root disk 8, 32 kesä    8 23:50 /dev/sdc

3) Connect the MMC or SD card to USB Memory Card Reader. After that Linux in your desktop will treat
the card as a USB memory stick.
- Linux should automatically detect and mount the newly inserted USB memory card.

4) Check what /dev node name Linux is now using for the newly inserted SD/MMC card.
- If this is the first time the MMC card is connected to the reader, a new sd* device node is reserved for the
card. Otherwise some of the already exising /dev node names are propably used.

Issue again the following command
    #"ls -la /dev/sd*"

This should now give you a following information revealing that /dev/sdd is used as a MMC or SD card.

    [root]$ ls -la /dev/sd*
    brw-rw----  1 root disk 8,  0 kesä    8 23:50 /dev/sda
    brw-rw----  1 root disk 8, 16 kesä    8 23:50 /dev/sdb
    brw-rw----  1 root disk 8, 32 kesä    8 23:50 /dev/sdc
    brw-rw----  1 root disk 8, 48 kesä    8 23:50 /dev/sdd
    brw-rw----  1 root disk 8, 49 kesä    8 23:50 /dev/sdd1

5) Unmount the  MMC card
Keep the MMC card in the card reader but unmount it if your Linux distribution has automatically mounted the card paritions.
For example in Mandrake Linux 10.2, the card was automatically mounted to /mnt/removable and the mount icon "Removable" appeared on the Gnome desktop. I unmounted the card simply by right mouse clicking the card and selecting
"remove" on the gnome desktop.

Unmount needs to be done to allow the re-partitioning of the card.

6) Open your card with FDISK to start the repartitioning
- Change to root user and open fdisk with command "fdisk /dev/sdd"
- Verify that you are really opened the memory card by giving a command:
    - "p"     (= print the partition table)
    --> Following kind of output should be displayed (Example is from my 256 mb MMC card)

        Device Boot      Start        End      Blocks   Id  System
        /dev/sdd1        1             979       250608+  6   FAT16

7) Destroy the existing FAT16 partition in fdisk by giving a command
        -"d"

8) Create the new fat32 partition by giving following commands
    (Note that it is important that fat partition is created before ext2 partition so that the bootloader can mount the correct partitions)
        - "n"    (=add a new partition)
        - "p"    (=primary)
        - "1"    (=first partition)
        - "1"    (=first cylinder)
        - "+50M"    (=size of 50 mb)
        - "t"    (=change the partition system id)
        - "b"    (=WIN95 fat32)
    - Verify that the FAT partition of 50 MB is created ok by giving command
        - "p"     (= print the partition table)

9) Create the EXT2 partition
        - "n"
        - "p"
        - "2"
        - "<press enter>"    (=default to start just after the fat partition)
        - "<press enter>"    (=default to end to the end of the memory stick)

10) Verify that both the FAT32 and EXT2 partitions were created succesfully by giving a command:
        - "p"
        --> For me the following kind of output was given

        Command (m for help): p

        Disk /dev/sdd: 256 MB, 256835584 bytes
        16 heads, 32 sectors/track, 979 cylinders
        Units = cylinders of 512 * 512 = 262144 bytes

       Device Boot      Start         End      Blocks   Id   System
        /dev/sdd1               1         192       49136    b    W95 FAT32
        /dev/sdd2             193         979     201472  83  Linux

11) Write the new partition tables to memory card with a following command:
(Warning this will delete all existing material from the memory stick)
        - "w"
        --> Fdisk writes partitions to memory card and exist

3.2 Format your just partitioned Memory Card to Fat32 and Ext2 partitions

You will now need to format the just created FAT32 and EXT2 partitions
1) Open console and change to root user
2) Verify that the new FAT32 and EXT2 partitions were created.
If the memory card was in /dev/sdd and you partioned it by opening dev/sdd with the fdisk, then there should exist following partitions
        - /dev/sdd1    (this will be formatted to FAT32 format)
        - /dev/sdd2    (this will be formatted to EXT2 format)
3) Format the FAT32 partition by giving command
        - "mkfs.vfat -f 1 /dev/sdd1" 
        (Warning, use name sda1, sdb1, sdc1, sdd1, according to the device and partitions you really have)
4) Format the ext2 partition by giving command
        - "mkfs.ext2 /dev/sdd2"   
        (Warning, use name sda2, sdb2, sdc2, sdd2, according to the device and partitions you really have)

3.3 Mount Fat32 and Ext2 partitions in the Desktop Linux

To be able to copy the files required for booting the H6300 you need to mount the FAT32 and EXT2 partitions.
In this example we assume that the FAT32 partition is mounted to /mnt/removable and EXT2 partition is mounted to /mnt/removable1. 

Most of the Linux desktops distributions can mount the FAT32 and EXT2 partitions from the memory card automatically when you re-insert the card to the Memory card reader. If this is not the case, then the root user can mount the partitions by hand by giving following kind of commands:

        - "mkdir /mnt/removable"
        - "mkdir /mnt/removable1"
        - "mount /dev/sdd1 /mnt/removable"
        - "mount /dev/sdd2 /mnt/removable-2"

3.4 Install Bootloader

The bootloader files are available in the h6300_linux_bootloader.tar.bz2 file that can be extracted from the h6300_gpe_image*.tar.bz2 tar ball
The latest version from the booloader files are following:  
   
Filename Description
wililo.exe Graphical WinCE dependent bootloader that can be used for launching Linux from WINCE. Allows selecting different boot options after which the boot options are passed to operating system independent second phase bootloader. (bootstrap.bin)
wililo.cfg
Configuration file for defining different bootloader options.
bootstrap.bin Operating system independent part of the bootloader. Will load and starts the kernel image by using the parameters passed to it from the wililo.exe
zImage Linux kernel image.

3.4.1 Copying Bootloader files to Fat32 partition

After FAT32 and EXT2 partitions has been mounted to your Linux desktop, you can start copying the bootloader files to your FAT32 partition. It can be done easily by extracting the files from the h6300_linux_bootloader.tar.bz2 to FAT32 partition.
       
1) Change to root user
    su
    <password>
2) Extract bootloader files
    tar -xvjf /path/to/h6300_linux_bootloader.tar.bz2 -C /mnt/removable

3.4.2 Bootloader Configuration

Boot options offered by wililo are configuable via wililo.cfg. Once wililo is launched, it reads wililo.cfg and uses information represented in there to create a list representing different boot possibilities.
Default configuration in wililo.cfg will allow the user to boot either form the MMC/SD card or from the NFS partition. The following command can be used for mounting the rootfs from the
second partition (ext2) of your MMC/SD card.

    set command "noinitrd root=/dev/mmcblk0p2 rw console=tty0 mem=64M at 0x10000000"

Following command could be used for example be used for mounting the rootfs from the nfs partition available in your desktop computer.

    set command "noinitrd ip=192.168.2.2:192.168.2.1:192.168.2.1:255.0.0.0:h6300:usb0: root=/dev/nfs nfsroot=192.168.2.1:/ipaq_rootfs mem=64M at 0x10000000"

3.5 Install Root Filesystem Files

The GPE files are available in the h6300_gpe_image_rootfs.tar.bz2 that can be extracted from the h6300_gpe_image*.tar.bz2.
The rootFS contains all the files needed by the Linux distribution.

3.5.1 Copying Root FS Files to Ext2 Partition

The h6300-gpe-image tar ball also contains the rootfs in file named h6300_gpe_image_rootfs.tar.bz2. This rootfs file needs to be extracted to Ext2 partition in MMC or SD card. It is important that the file-permissions, ownerships and execution flags remains same than they are in the rootfs tar bz2.  Therefore you need to extract the files as a root user by doing it for example in a following way:

1) Change to root user
    #su
    #<password>
2) Extract rootfs files to ext2 partition in MMC/SD card
    #tar -xvjf gpe-image-h6300-rootfs.tar.bz2 -C /mnt/removable-2

4. Booting Linux

After you have copied all files to Fat32 and Ext2 partitions, you are almost ready to boot to Linux.

4.1 Steps Required for Booting to Linux from Wince

1) Backup your data in WINCE by using backup/restore utility
2) Hard reset your WINCE by holding the stylus in small hole in the bottom left for a couple of second while simultaneously keeping the power button down
3) Calibrate WINCE after hard reset is performed
4) Enable the phone in WINCE
5) Open the file explorer in the WinCE and go to "Storage Card" which should display the fat32 partition
6) Execute the command wililo.exe
7) Select your boot option
    - MMC/SD for normal boot
    - NFS for booting from the NFS partition in your Linux desktop. Recommended for development purposes. See chapter dedicated for this below.
8) The screen flashes to black for a while when the bootstrap.bin is launched
9) Bootstrap.bin loads the and Kernel Image and launch it
11) Linux console messages and the picture of tux (top left corner) appears to screen
12) White GPE boot image disappears for a while again
13) X with the touschreen calibrarion screen is launched
    --> Calibrate your screen
14) Password for the root user is queried
-- >Enter root user password
15) Enter normal user information and password
16) Login

note: Boot process has some hardware initialization problem which is why the step between 3 and 4 does not always work reliably.
You know that the boot process has failed if the Linux console text does not start to appear in the console after 30 seconds after the "Booting to Linux" text.
In such a case you should just reset the h6300 and try to boot again.

4.2 Rebooting back to WINCE from Linux

1) Hard reset is required to be able to boot in the Wince. (Softreset will cause the wince boot to hang)
- press for a couple of seconds the power button while pressing the stylus to the small hole in the left down of the h6300

5 Booting from the NFS partition for the Development Purposes

This boot method is usefull when you are developing either the applications or kernel modules and want to test them fastly by simply copying files to NFS partition
after building them over the SSH connection for example.

5.1 Configuring USBNet to allow TCP/IP between h6300 and Desktop Computer over USB caple

You can use the USB cable & h6300 Gadget for enabling the TCP/IP communication. for example in a following way:

    1) h6300 is connected to the USB gradle
    2) You select the NFS boot option from the wililo's menu
    3) Once the boot starts, the device reserves an ip address 192.168.2.2 for the USB0 interface.
    --> USB0 interface routes traffic over USB cable. Therefore the Linux in the desktop must also be configured in such a way that it will take the USB0 interface for itself dynamically.

    4) Map usb0 to usbnet by adding following line to /etc/modprobe.conf

            alias usb0 usbnet

    5) Configure usb0 to use IP address 192.168.2.1 in the desktop linux. In Mandrake Linux 10.2 this is performed by creating a file /etc/sysconfig/network-scripts/ifcfg-usb0

            DEVICE=usb0
            BOOTPROTO=static
            IPADDR=192.168.2.1
            NETMASK=255.255.255.0
            NETWORK=192.168.2.0
            BROADCAST=192.168.2.255
            ONBOOT=yes
            MII_NOT_SUPPORTED=no

    6) When the h6300 boots and establish the USBNET connection, ifconfig command should display you something like this if executed as a root user.

    #ifconfig
    usb0  Link encap:Ethernet  HWaddr 4A:83:FD:09:39:5C
          inet addr:192.168.2.1  Bcast:192.168.2.255  Mask:255.255.255.0
          inet6 addr: fe80::4883:fdff:fe09:395c/64 Scope:Link
          UP BROADCAST RUNNING MULTICAST  MTU:1500  Metric:1
          RX packets:266 errors:0 dropped:0 overruns:0 frame:0
          TX packets:480 errors:4 dropped:0 overruns:0 carrier:0
          collisions:0 txqueuelen:1000
          RX bytes:33415 (32.6 Kb)  TX bytes:48046 (46.9 Kb)

    7) Configure your firewall to allow network traffic between USBnet and your network. If you also want to allow connection to internet from h6300 you need to setup ip masquerading. Here is example if you are using shorewall as your firewall: (also ip masquerading is configured to shorewall rules)

5.2 Booting from the NFS partition

  1. Make sure you have portmap etc files running that you need to make NFS share from your desktop
  2. Make sure that you have configured USBNet in your desktop computer (descriped earlier)
  3. Copy kernel and other bootloader files to FAT partition of MMC/SD card just like when mounting rootfs from the MMC card
  4. Create directory for your rootfs in the desktop device as a root user (for example to directory named /ipaq_rootfs)
  5. Extract rootfs files to /ipaq_rootfs dir as a root user
  6. Create NCF partition share for IP addresses from 192.168.2.x network by adding following to /etc/exports file
  7. Restart NFS services so that new export starts to work
  8. Follow the SD/MMC card boot procedure except that select the NFS boot option from the wililo's boot option list

6. Tips and Tricks

6.1 Preventing file corruptions while extracting files to Ext2 partition

1) Remember to unmount the MMC/SD card partitions after you have copied or extracted files to MMC/SD partitions. The unmount will make sure that files are really synced correctly from the cache to the partitions.

2) With older Linux distributions and kernels (2.6.11 and older) many Linux distributions seemed to have problems for copying lot of files to SD/MMC card partitions. With those the usage of flush command manually
made things work a little bit better.

3) In the case of file system corruption, you can clean errors from partition by using fsck command after unmounting the partition. For example:

   a) unmount both the EXT2 and SD parttions by using the grapchical commands in your Linux desktop system or by doing following in the command line
    # su
    # <password>
    # umount /mnt/removable && umount /mnt/removable-2
    b) Run disk check from the partition while they are unmounted
    #"fsck -t fat /dev/sdd1"
    #"fsck -t ext2 /dev/sdd2"

6.2 Connecting to Original h6300's Bootloader

You can connect to origianal h6300 bootloader with minicom in a following way: (thanks for the Everett in fuzzuneural.net for documenting this first)

    a) Reboot the ipaq
    b) Hold down the 'email' and 'contacts' buttons before the tmobile screen appears.
    c) Insert the ipaq into the cradle
        ---> you should then see "BL" in bottom  left hand corner.
    d) When the ipaq is in the cradle you should see "USB" at the bottom.  If your ipaq is not plugged in, you should see "No AC"... 
    e) Configure minicom and made connection

6.3 Using Alternative Bootloader uboot_load

In addition of using graphical wililo.exe it is also possible to use other non-graphical bootloaders available in our svn repository.

    1) uboot_load
       This bootloader can be used if user does not want to see the graphical menu offering various boot options. Parameters used for booting can be configured from the configuration file.
       If boot options are not specified, this bootloader has very nice feature. It will open telnet server to port 9999 and will allow users connect to it.  After that you can use various commands for
    2) uboot
       Our svn repository has also a WINCE launchable port from the commonly used uboot loader. Port includes also features allowing to check the flash partition data (h6300 has 64 MB Millenium MDOC + flash)
       and for loading the kernel over the USB cable to device before booting to Linux.

6.4 When NFS boot option is usefull

For the development the fastest method to work is by mounting rootfs from the NFS partition.
Mounting rootfs from the NFS partition instead of using MMC card has has following advantages:
Only drawback in rootfs over NFS partition is ofcourse that you can not take the machine away from USB cradle. (Unless you manage to mount it over bt,wlan or gprs...)

6.5 Files in the GPE Root filesystem

Following are the most important configuration files and locations in the GPE rootfs image available for the h6300. Most of these files are already configured ok in the rootfs image.

Name Description
/etc/resolv Nameservers ip address. ppp/GPRS scripts are able to update the nameserver and routing information automatically once the connection is established.
/etc/profile.d/tslib.sh File that need to be executed for enabling the touschreen to work.
/usr/share/tslib/ts.conf-h6300 h6300 specific touschreen configuration file.
/etc/inittab Runlevel, etc...
/etc/init.d/rcS Script executed during the boot. I have made small modification to this file to force the IP of device to be 192.168.2.2
/etc/init.d/gpe-dm Script that starts X and GPE desktop. I have made small hack to this script so that it calls /etc/init.d/tslib.sh in order to configure touschreen driver
/etc/gpe

/etc/X11

/etc/ppp
ppp scripts for the gprs connection establishment. (launch with "/usr/sbin/pppd call gprs" command)
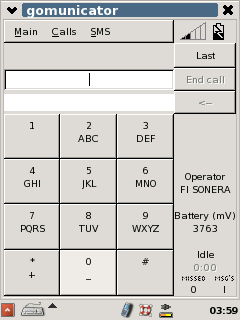
/usr/local/gomunicator/sound/rtone/default.wav
Ringing tone used by gomunicator for alarming from the incoming call. Hopefully somebody would have time for replacing with the tremour based ogg player code in the future.