1. Overview

It is now possible to boot HP Ipaq H6300 series devices to 2.6 kernel based Linux and start GPE session! In addition it is possible to establish SSH connection to it. We have tested the H6340 models sold in the Europe and H6315 model available in the USA. The H6365 model available in the Asia is not tested but it will probably work in a similar way.

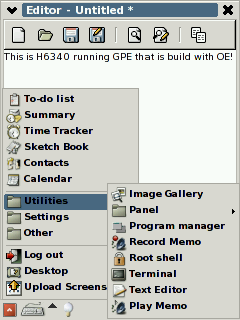
H6340 and GPE desktop

All required software is available in this site both in the sources and prebuild binaries. Binaries are build by using OE build system targetted for the handheld devices. (http://oe.handhelds.org) Sources are available in the OE's repository as all of the h6300 specific patches and configuration systems required for building binaries are submitted there.

Current bootsystem uses two phase bootloader, the first part of the bootloader is a Wince executable launched in the Wince and second part is the Linux executable. This allows using Linux in parallel to Wince. Booting back to Wince from Linux requires hard reset that resets all user data stored to Wince's flass memory. Therefore it is recommended that you backup the Wince by using backup/restore application available in the wince start menu before booting to Linux.

The easiest way start working with the H6300 Linux port is to install the binary version. When everything is booting nicely, it is easy to start to building own kernel or applications and add them to the system.

Required hardware and software:
Name Description
Desktop Linux For installing and building applications for the H6300.
MMC Card For booting the kernel and rootfs. It is also possible to load the rootfs from the desktop linux by using NFS. Note that currently the only the MMC cards works, SD or Secure SD cards does not work have mounting problems.
MMC memory card reader (USB connection) Required for partitioning the MMC card to VFAT32 and Ext2 partitions in the desktop Linux. Usually the MMC memory card reader is connected to desktop computers USB port. Costs about 20 - 40 euro/dollar.
H6300 USB Gradle The cradle which comes within the H6300.The TCP/IP communication between H6300 and Desktop Linux is established over this cable.
Wince executable part of the bootloader loadin.exe, bootstrap.txt
Linux executable part of the bootsystem Bootstap, vmlinux, initrd
Rootfs Functional linux system with X windows, initrd, ssh daemon, ftp daemon, etc...

2. Binary Installation

For the binary installation the MMC card must be partitioned to FAT32 partition and EXT2 partition.
Bootloaders wince executable (loadin.exe), bootloaders Linux executable (bootstap) and kernel image and kernel initrd file must be copied to FAT32 partition. Rootfs is instead copied to EXT2 partition.

To be able to make the partitioning for MMC card, you need to buy a MMC memory card reader that can be connected to Desktop Linux. I have USB based Lacie 8-in-1 Reader which costed about 25 euro and supports MMS, SD and Secure SD cards.

2.1 Files you need to download

Following are the files you need to download for the succesfull build.
Name/Location Description
snapshots/binaries/gpe/h6300_gpe_image_20060521.tar.bz2
14fef0c251c38c2921831e34e214d354
All files needed to boot h6300 from Wince to Linux GPE environment. Files needs to be copied to MMC cards VFAT32 and EXT2 partitions.

2.2 Create FAT32 and EXT2 partitions to MMC Memory Card

1) Start console and check what node names linux has already reserved for the various USB based memory
cards you have connected for your desktop linux by using  command "ls -la /dev/sd*".

    [root]$ ls -la /dev/sd*
    brw-rw----  1 root disk 8,  0 kesä    8 23:50 /dev/sda
    brw-rw----  1 root disk 8, 16 kesä    8 23:50 /dev/sdb
    brw-rw----  1 root disk 8, 32 kesä    8 23:50 /dev/sdc

2) Connect the MMC card to Memory Card Reader
3) Check what node name Linux has reserved for the card
- Linux should automatically detect and mount the newly inserted USB memory card.
- If this is the first time the MMC card is connected to the reader, a new sd* device node is reserved for the
card. Otherwise the card is using one of the already existing sd* node names.
When I inserted the MMC card first time and used ls -la command again, a new /dev/sdd node has appeared for me.

    [root]$ ls -la /dev/sd*
    brw-rw----  1 root disk 8,  0 kesä    8 23:50 /dev/sda
    brw-rw----  1 root disk 8, 16 kesä    8 23:50 /dev/sdb
    brw-rw----  1 root disk 8, 32 kesä    8 23:50 /dev/sdc
    brw-rw----  1 root disk 8, 48 kesä    8 23:50 /dev/sdd

4) Unmount the  MMC card
Keep the MMC card in the reader but unmount it if Linux has automatically mounted it.
For example for me in Mandrake Linux 10.2, the card were automatically mounted to /mnt/removable and mount icon "Removable" appeared to Gnome desktop. I unmounted the card simply by right mouse clicking the card and selecting
"remove" in the gnome desktop.

Unmount needs to be done so that the the Linux processes does not prevent partitioning the card.

5) Open MMC card with FDISK for starting the repartitioning
 - As a root user open fdisk with command
    "fdisk /dev/sdd"
- Verify that you are really opened the memory card by giving command
    - "p"     (= print the partition table)
    --> Following kind of output should be displayed (Example is from my 256 mb MMC card)

        Device Boot      Start        End      Blocks   Id  System
        /dev/sdd1        1             979       250608+  6   FAT16

6) Destroy existing FAT16 partition in fdisk by giving command
        -"d"
7) Create the new fat32 partition by giving following commands
    (Note that it is important that fat partition is created before ext2 partition so that the bootloader can mount the correct partitions)
        - "n"    (=add a new partition)
        - "p"    (=primary)
        - "1"    (=first partition)
        - "1"    (=first cylinder)
        - "+50M"    (=size of 50 mb)
        - "t"    (=change the partition system id)
        - "b"    (=WIN95 fat32)
    - Verify that the FAT partition of 50 MB is created ok by giving command
        - "p"     (= print the partition table)
8) Create ext2 partition
        - "n"
        - "p"
        - "2"
        - "<press enter>"    (=default to start just after the fat partition)
        - "<press enter>"    (=default to end to the end of the memory stick)
9) Verify that both the FAT32 and EXT2 partitions were created succesfully by giving command
        - "p"
        --> For me the following kind of output was given

        Command (m for help): p

        Disk /dev/sdd: 256 MB, 256835584 bytes
        16 heads, 32 sectors/track, 979 cylinders
        Units = cylinders of 512 * 512 = 262144 bytes

       Device Boot      Start         End      Blocks   Id   System
        /dev/sdd1               1         192       49136    b    W95 FAT32
        /dev/sdd2             193         979     201472  83  Linux
10) Write new partition tables to memory card by giving command
(Warning this will delete all existing material from the memory stick)
        - "w"
        --> Fdisk writes partitions to memory card and exist

2.3 Format Memory Card to FAT32 and EXT2 partitions

1) Open console and change to root user
2) Verify that the new FAT32 and EXT2 partitions were created.
If the memory card was in /dev/sdd and you partioned it by opening dev/sdd with the fdisk, then there should exist following partitions
        - /dev/sdd1    (this will be formatted to FAT32 format)
        - /dev/sdd2    (this will be formatted to EXT2 format)
3) Format the FAT32 partition by giving command
        - "mkfs.vfat /dev/sdd1" 
        (Warning, use name sda1, sdb1, sdc1, sdd1, according to the device and partitions you really have)
4) Format the ext2 partition by giving command
        - "mkfs.ext2 /dev/sdd2"   
        (Warning, use name sda2, sdb2, sdc2, sdd2, according to the device and partitions you really have)

2.4 Mount FAT32 and EXT2 partitions in the Desktop Linux

To be able to copy the files required for booting the H6300 you need to mount the FAT32 and EXT2 partitions.
In this example we assume that the FAT32 partition is mounted to /mnt/removable and EXT2 partition is mounted to /mnt/removable1. 

Most of the Linux desktops distributions can mount the FAT32 and EXT2 partitions from the memory card automatically when you re-insert the card to the Memory card reader. If this is not the case, then the root user can mount the partitions by hand by giving following kind of commands:

        - "mkdir /mnt/removable"
        - "mkdir /mnt/removable1"
        - "mount /dev/sdd1 /mnt/removable"
        - "mount /dev/sdd2 /mnt/removable1"

2.5 Copy bootstrap files to FAT32 Partition

After FAT32 and EXT2 partitions has been mounted you can start copying files required in order to boot the Linux successfully. We will first copy the bootstrap files. h6300_gpe_image_20060521.tar.bz2 contains h6300_linux_bootloader.tar.bz2 for bootloader files. Following bootloader files needs to be extracted to the FAT32 partition.

    -rwxr--r--  1 lamikr adm   26116 kesä   12 21:45 bootstrap.bin*
    -rwxr--r--  1 lamikr adm     557 kesä   12 21:45 bootstrap.txt*
    -rwxr--r--  1 lamikr adm     285 kesä   12 21:46 debug.txt*
    -rwxr--r--  1 lamikr adm 3102400 kesä   12 21:46 Image*
    -rwxr--r--  1 lamikr adm 2097152 kesä   12 21:46 initrd*
    -rwxr--r--  1 lamikr adm    7680 kesä   12 21:46 loadin.exe*   (old bootloader)
    -rwxr--r--   1 lamikr lamikr   588892 Nov 11  2005 uboot_load.exe   (new bootloader)
    -rwxr--r--   1 lamikr lamikr      975 Nov 11  2005 uboot.txt*
   
   
Filename Description
bootstrap.bin Linux executable part of the bootloader which starts the kernel image.
bootstrap.txt contains configuration information needed by the bootloader for booting the Linux. Loadin.exe will read this file.
Image Linux kernel image.
initrd Loopback filesystem used by some Linux bootsystems for initializing the second phase of Linux boot. h6300 does not currently use this, but due to bug in bootloader this file is needed anyway.
loadin.exe Wince executable which needs to be launched from Wince to start the boot process.
uboot_load.exe
Newer bootloader than loadin.exe. Allows also connecting over wlan and dumping memory while being in wince. (Port 9999)
uboot.txt
configuration file for uboot_load.exe

       
In theory the bootstrap.txt could be configured so that the boot uses only the loadin.exe for booting the system but this version of loadin.exe has certain bugs which requires using two phase boot procedure.

1) Change to root user
    su
    <password>
2) Change to /mnt/removable
    cd /mnt/removable
3) cp loading.exe .
4) cp initrd .
5) cp Image .
6) cp bootstrap.txt .
7) cp bootstrap.bin .

2.6 Bootstrap Configuration

Bootstap.txt contains following configuration settings for controlling the boot process.

;Second phase bootloader executable location when the loadin.exe loads the file in Wince
Bootstrap = \Storage Card\bootstrap.bin
;Initrd image location when the loadin.exe loads the file in Wince. (Actually we do not use initrd while booting as we pass option "noinitrd" to kernel.
Initrd    = \Storage Card\initrd
; Kernel Image location location when the loadin.exe loads the file in Wince
Image     = \Storage Card\Image
; Machine Type, see Linux source file
Type      = 563
; Linux boot command which mounts the /dev/mmcblk0p2 (ext2) partition as a rootfs.
; After this the boot will execute the /linuxrc from the rootfs.
Cmdline      = noinitrd root=/dev/mmcblk0p2 rw console=tty0 mem=64M at 0x10000000
; This will be used to allocate extra space required by second bootstrap, the value in KB
Heap      = 4

For non english versions of Wince some path must be adapted according to what the storage card is called in the Wince file manager:
Wince language
Bootstrap
Initrd
Image
English Bootstrap = \Storage Card\bootstrap.bin
Initrd = \Storage Card\initrd
Image = \Storage Card\Image
German Bootstrap = \Speicherkarte\bootstrap.bin
Initrd = \Speicherkarte\initrd
Image = \Speicherkarte\Image

2.7 Copy RootFS Files to EXT2 Partition

h6300-gpe-image_20051110.tar.bz2 contains also the the rootfs in file named gpe-image-h6300-rootfs.tar.bz2. This rootfs file needs to be extracted to ext2 partition of MMC card. It is important that the file-permissions and execution flags stays exactly in the same than they are in the gpe-image-h6300-rootfs.tar.bz2  file. Execute therefore following commands in Linux Desktop.

Rootfs name
md5sum
h6300_gpe_image_rootfs.tar.bz2 f5a4862e7750715fcbd284bd0f34e2d1


1) Change to root user
    su
    <password>
2) Change to /mnt/removable1
    cd /mnt/removable1
3) tar -xvjf gpe-image-h6300-rootfs.tar.bz2

2.8 RootFS configuration

Rootfs contains busybox which offers pretty light implementation from most of the unix commands. Rootfs is
configured to use so that the H6300 will get the ip address 192.168.2.2 when the h6300 is booted. In addition the kernel and rootfs is configured to try to establish the TCP/IP connection over the H6300 USB Cadget. (Requires that the h6300 is kept in the cadget during the boot process)

Following are the most important configuration files in the rootfs

Name Description
/etc/resolv Nameservers ip address
/etc/profile.d/tslib.sh File that need to be executed for enabling the touschreen to work.
/usr/share/tslib/ts.conf-h6300 H6300 specific touschreen configuration file.
/etc/inittab Runlevel, etc...
/etc/init.d/rcS Script executed during the boot. I have made small modification to this file to force the IP of device to be 192.168.2.2
/etc/init.d/gpe-dm Script that starts X and GPE desktop. I have made small hack to this script so that it calls /etc/init.d/tslib.sh in order to configure touschreen driver.

2.9 Usernames and Passwords

Following usernames and passwords are configured to /etc/passwd and /etc/shadow files of the rootfs.

Username Password
root <empty>

2.10 Configuring USBNet to allow TCP/IP between h6300 and Desktop Computer over USB caple

When the H6300 is connected to the USB gradle during the boot it reserves ip address 192.168.2.2 for the USB0 interface which routes traffic over USB cable. Therefore the Linux in the desktop must also be configured in such a way that it will take the USB0 interface for itself dynamically. Basically the following steps are needed

1) Map usb0 to usbnet by adding following line to /etc/modprobe.conf

    alias usb0 usbnet

2) Configure usb0 to use IP address 192.168.2.1 in the desktop linux. In Mandrake Linux 10.2 this is performed
by creating a file /etc/sysconfig/network-scripts/ifcfg-usb0

    DEVICE=usb0
    BOOTPROTO=static
    IPADDR=192.168.2.1
    NETMASK=255.255.255.0
    NETWORK=192.168.2.0
    BROADCAST=192.168.2.255
    ONBOOT=yes
    MII_NOT_SUPPORTED=no

When the h6300 boots and establish the USBNET connection, ifconfig command should display you something like this
when executed as a root user.

#ifconfig
usb0  Link encap:Ethernet  HWaddr 4A:83:FD:09:39:5C
          inet addr:192.168.2.1  Bcast:192.168.2.255  Mask:255.255.255.0
          inet6 addr: fe80::4883:fdff:fe09:395c/64 Scope:Link
          UP BROADCAST RUNNING MULTICAST  MTU:1500  Metric:1
          RX packets:266 errors:0 dropped:0 overruns:0 frame:0
          TX packets:480 errors:4 dropped:0 overruns:0 carrier:0
          collisions:0 txqueuelen:1000
          RX bytes:33415 (32.6 Kb)  TX bytes:48046 (46.9 Kb)

3) Configure your firewall to allow network traffic between USBnet and your network. If you also want to allow connection to internet from h6300 you need to setup
ip masquerading. Here is example if you are using shorewall as your firewall: (also ip masquerading is configured to shorewall rules)

2.11 Recovering from the file copy errors when copying files MMC partitions

When copying large files to MMC card can fail pretty easily at least in some Linux systems. Therefore it is recommended to call sync command in the another console pretty often when copying files to MMC card.
(Sync command forces linux to flush the files copied)

If there appears errors during the file copy, you can clean errors from partition by using fsck command for example
in a following way.
   
    "fsck -t fat /dev/sdd1"
    "fsck -t ext2 /dev/sdd2"

Sometimes you need to reboot your Desktop to fully recover from this kind of copy errors.

2.12 Alternative Boot Method -- Mounting Rootfs from the NFS partition

2.12.1 Why to use NFS partition

For the development the fastest method to work is by mounting rootfs from the NFS partition.
Mounting rootfs from the NFS partition instead of using MMC card has has following advantages:
Only drawback in rootfs over NFS partition is ofcourse that you can not take the machine away from USB cradle. (Unless you manage to mount it over bt,wlan or gprs...)

2.12.2 Booting from the NFS partition

  1. Make sure you have portmap etc files running that you need to make NFS share from your desktop
  2. Make sure that you have configured USBNet in your desktop computer (descriped earlier)
  3. Copy kernel and other bootloader files to FAT partition of MMC/SD card just like when mounting rootfs from the MMC card
  4. Create directory for your rootfs in the desktop device as a root user (for example to directory named /ipaq_rootfs)
  5. Extract rootfs files to /ipaq_rootfs dir as a root user
  6. Create NCF partition share for IP addresses from 192.168.2.x network by adding following to /etc/exports: /ipaq_rootfs 192.168.2.0/255.255.255.0(rw,no_root_squash,sync)
  7. Restart NFS services so that new export starts to work
  8. Change bootcommand from the bootloader config file. I have following uboot.txt in my MMC card for booting iPAQ with uboot_load over NFS.
# set the path where all of you files are
set path "\Storage Card"
# set kernel image
set kernel "zImage"
# set the initrd image
set initrd "initrd"
# set the heap size required by second bootstrap in KB
set heap 10
# set the second boot loader
set loader "bootstrap.bin"
# commands to be passed to the kernel
#set command "noinitrd root=/dev/mmcblk0p2 rw console=tty0 mem=64M at 0x10000000"
set command "noinitrd ip=192.168.2.2:192.168.2.1:192.168.2.1:255.0.0.0:h6300:usb0: root=/dev/nfs nfsroot=192.168.2.1:/ipaq_rootfs mem=64M at 0x10000000"
# load kernel, initrd or loader
# order of operations:
#  0 loader
#  1 kernel, initrd
load
      
    Now just put your h6300 to USB cradle that is connected to desktop and boot h6300 by launching uboot_load.exe

3. Booting Linux

After you have copied all files to FAT32 and EXT2 partitions, you are almost ready to try to boot to the Linux.

3.1 Booting

There is some bug in the bootprocess why the step between 3 and 4 does not always work reliably.
You know that the boot process has failed, if the Linux console textes does not start to appear in the console after 30 seconds after the "Booting to Linux" text. In such a case you should just reset the h6300 and try to boot again.
1) Open file explorer in the Wince and go to "Removable Storage" which should display the fat32 partition
2) Execute command loadin.exe
3) Screen changes to black and loading loads the bootstap, Initrd and Image files and displays their md5sums.
4) Booting Linux text appears and after a couple of seconds the screen flashes again and the screen starts outputting information from the Linux bootprocess which initializes the kernel, mounts the ext2 partition, etc...
5) In the end of the boot process you should see how the system pings addresses 192.168.2.1 (itself)
and 192.168.2.2 which should be ip address for your desktop linux USB0 interface.
6) Connect to h6300 from desktop linux by using sftp or ssh.
    - ssh root@192.168.2.2
       (password is empty "" for the root-user by default)

3.2 Resetting Back to Wince

1) Hard reset is required to be able to boot in the Wince. (Softreset will cause the wince boot to hang)
- press couble of seconds the power button down while pressing key to the small hole in the left down of the h6300.

4. Tips and Tricks

4.1 Connecting to H6300's Original Bootloader

Even nothing has been yet done to allow direct booting to Linux, it may be possible to do this by connecting to the origianl bootloader of h6300. I have not tested by myself but http://fuzzyneural.net/projects/h6315/progress/boot_loader
says that it should be possible to access the original bootloader with with minicom in a following way:

You must reboot the ipaq, and hold down the 'email' and 'contacts' buttons before the tmobile screen appears.  Then insert the ipaq into the cradle, you should then see "BL" in bottom  left hand corner.  When the ipaq is in the cradle you should see "USB" at the bottom.  If your ipaq is not plugged in, you should see "No AC"...  now to configure minicom to work....

4.2 Using Alternative Bootloader called uboot_loader

Instead of using loading.exe it is also possible to use another bootloader called uboot_load.
This bootloader has additional features which may be very helpful at least if you are taking part of the h6300 kernel development.

5. Default Passwords

Default passwords configured to rootfs are following.
Userid Password
root <empty>

6. References

6.1 HTTP Pages


Name/Address Description
http://fuzzyneural.net/projects/h6315/ A web page and CVS repository hosted by Everett Coleman II.
Lot of information regarding to the H6300 port.
CVSROOT=:pserver:anoncvs@fuzzyneural.net:/h6300,
password is empty
CVS repository for the latest H6300 kernel and uboot_loader sources.
http://www.handhelds.org/moin/moin.cgi/HpIpaqH6315
Detailed information from the hardware and registers that the h6300 has.
http://familiar.handhelds.org/ Home of Linux ports to various different HP/Ipaq models.
http://gpe.handhelds.org/ Open source based GPE graphical environment for X. Uses Gnome based library.
http://opie.handhelds.org/cgi-bin/moin.cgi/ Open source based GPE graphical environment for X. It is a fork of the QTopia environment developed by Trolltech.
ftp://ftp.handhelds.org/projects/toolchain/
arm-linux-gcc-3.3.2.tar.bz2
Binaries for the working GCC Linux crosscompiler. Beware that the 3.4.1 in the same directory does not work with the h6300.
http://www.arm.linux.org.uk/developer/ Home of the ARM Linux Developer pages. Hosted by Russel King.
http://www.muru.com/linux/omap/ Tony Lindgren's maintained OMAP Linux kernel pages. Tony is also the main maintainer of the Linux omap source tree.
http://source.mvista.com/git/gitweb.cgi?
p=linux-omap-2.6.git;a=log;t=7
GIT repository for the Linux-Omap Source tree.
http://free-electrons.com/training/drivers/en Excellent tutorial and exercices that teach you the most essential steps needed for porting Linux to embedded devices.
http://focus.ti.com/general/docs/wtbu/
wtbuproductcontent.tsp?templateId=6123&navigationId
=12314&path=templatedata/cm/product/data/omap_1510
Very clear picture and information how different parts of the OMAP 1510 motherboard are connected to each others.
http://focus.ti.com/docs/general/splashdsp.jhtml?&
path=templatedata/cm/splashdsp/data/linux_com_portal
TI's Linux Community Web page for OMAP processors
http://focus.ti.com/docs/prod/folders/print/omap5910.html Information about OMAP 5910 and OMAP 1510. H6300 is based on to Omap 1510 but according to TI's website the 1510 is also
http://www.maemo.org/ Development platform targeted for the Nokia 7700.
http://acx100.sourceforge.net/ Open source drivers for TI's wireless cards.
http://www.microsoft.com/downloads/details.aspx?
familyid=1DACDB3D-50D1-41B2-A107-FA75AE960856&
displaylang=en
Download page for Microsoft eVC 4.0 C/C++ Development environment for Wince. Note the registration key "TRT7H-KD36T-FRH8D-6QH8P-VFJHQ" from the end of the page.
http://smslink.sourceforge.net/s_install.html Userspace utilities for controlling GSM/GPRS functionality in Linux.
http://www.kernel.org/git/ Various Linux kernel GIT repositories

6.2 Mailing Lists

Name/Address Description
linux-omap-open-source@linux.omap.com OMAP linux kernel specific mailing list.
See
h6300-port@handhelds.org Home of the h6300 port specific discussion.
See http://www.handhelds.org/email_lists.html
kernel-discuss@handhelds.org Kernel specific handheld mailing list.
See info from the other lists in
http://www.handhelds.org/email_lists.html
familiar@handhelds.org User discussion group for the handhelds PDA's.
See http://www.handhelds.org/email_lists.html
linux-arm-kernel@arm.linux.org See info from ARM linux mailing list from
http://www.arm.linux.org.uk/mailinglists/lists.php

6.3 IRC Channels

Name Description
#h6300-port@irc.freenode.net h6300 port specific discussion. Place where hackers have party after Europen midnight, unfortunately... :-)
#oe@irc.freenode.net,
#gpe@irc.freenode.ned,
#familiar@irc.freenode.net & #handhelds.org@irc.freenode.net
Handheld scpecific ircs

7. H6300 Port Contributors